How To Make Homemade Kombucha Three Ways
I’ve been making homemade kombucha for about five years now.
I remember when I got my first SCOBY and starter from a fellow health coach in a little jar. She gave me all these instructions and things to watch out for to give me the best chance of the kombucha succeeding.
I quickly jumped online, watched a few videos, and made sure that I was super prepared. I ended up being pretty overwhelmed by all these ‘rules’.
What I soon realised was homemade kombucha is a super simple, cost-effective way of getting good bacteria in your gut.
Free Recipe eBook
Join our newsletter and get our eBook featuring exclusive breakfast recipes to kickstart your mornings.
The problem with store-bought kombucha
It’s no surprise that kombucha has become very popular around the world as a healthy soft drink alternative. Even though I’m constantly brewing my homemade kombucha, I still find myself buying some when I’m out from time to time.
However, my main problem with the store-bought ones is that most of them are super sweet. When it’s really sweet, it means that the bacteria haven’t had the chance to eat enough sugar yet (which is the fermentation process), or that they have added sugar back into it to make it almost like a soft drink to appeal to a broader market.
This defeats the purpose of drinking kombucha for its benefits completely!
This post may contain affiliate links, for which we earn a small commission at no additional cost to you. Read our full disclosure here.
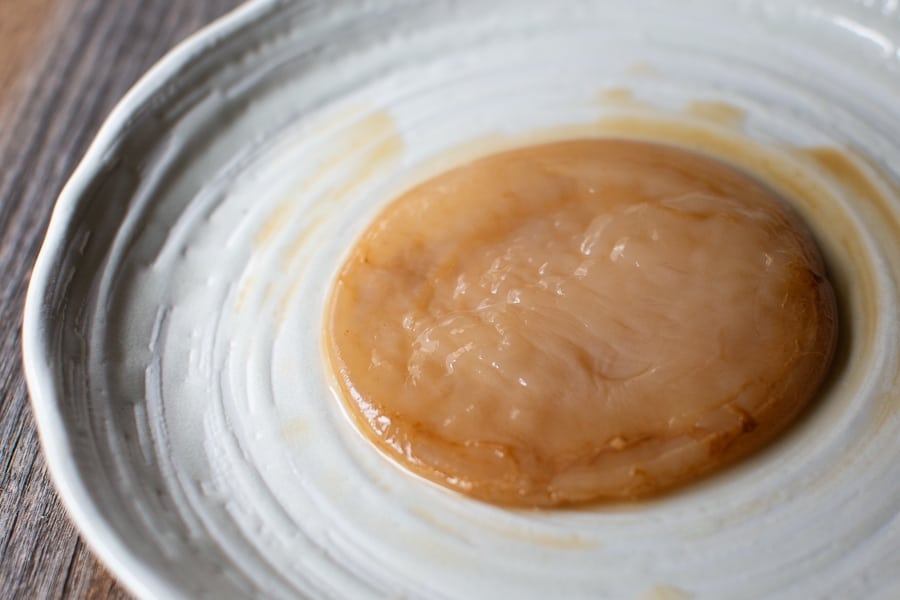
Don’t be put off by how your SCOBY looks!
When you get yourself a SCOBY (stands for Symbiotic Culture of Bacteria and Yeast) and some starter (which is just the liquid from the previously made batch—like a sourdough starter), if you look after it well, you can have homemade kombucha for years to come.
What you see above is an image of what the SCOBY looks like. It takes some time to get used to it when you first start making it. The idea of seeing a fungus growing inside of a big jar with tea may sound a bit odd, but trust me, it’s so worth it!
What is kombucha?
Kombucha is a fermented tea that is typically made using black tea, water, sugar, a SCOBY, and a starter. It’s a drink that has been around for thousands of years but has only recently made an appearance more widely. It can now be found in most cafes and supermarkets.
I remember trying kombucha for the first time at a market when I was at the coast with my family for a holiday about eight years ago. The kombucha drink grabbed my attention as I was curious to know what this fermented tea would taste like.
I’ve been into healthy foods for a while, and I thought it was really interesting. I gave some to my dad to taste, and he said that his grandma used to make it when he was a little boy. Like sauerkraut, it has been around for a really long time but has only now started growing into the commercial market.
Even then, nothing quite beats a fresh brew of your very own homemade kombucha. Trust me, you’ll be hooked!
Creating different flavours for your homemade kombucha
Kombucha can vary in taste depending on which tea is used, what the sugar/water ratio is, how long you leave it to ferment, and what flavours you add to it when bottling.
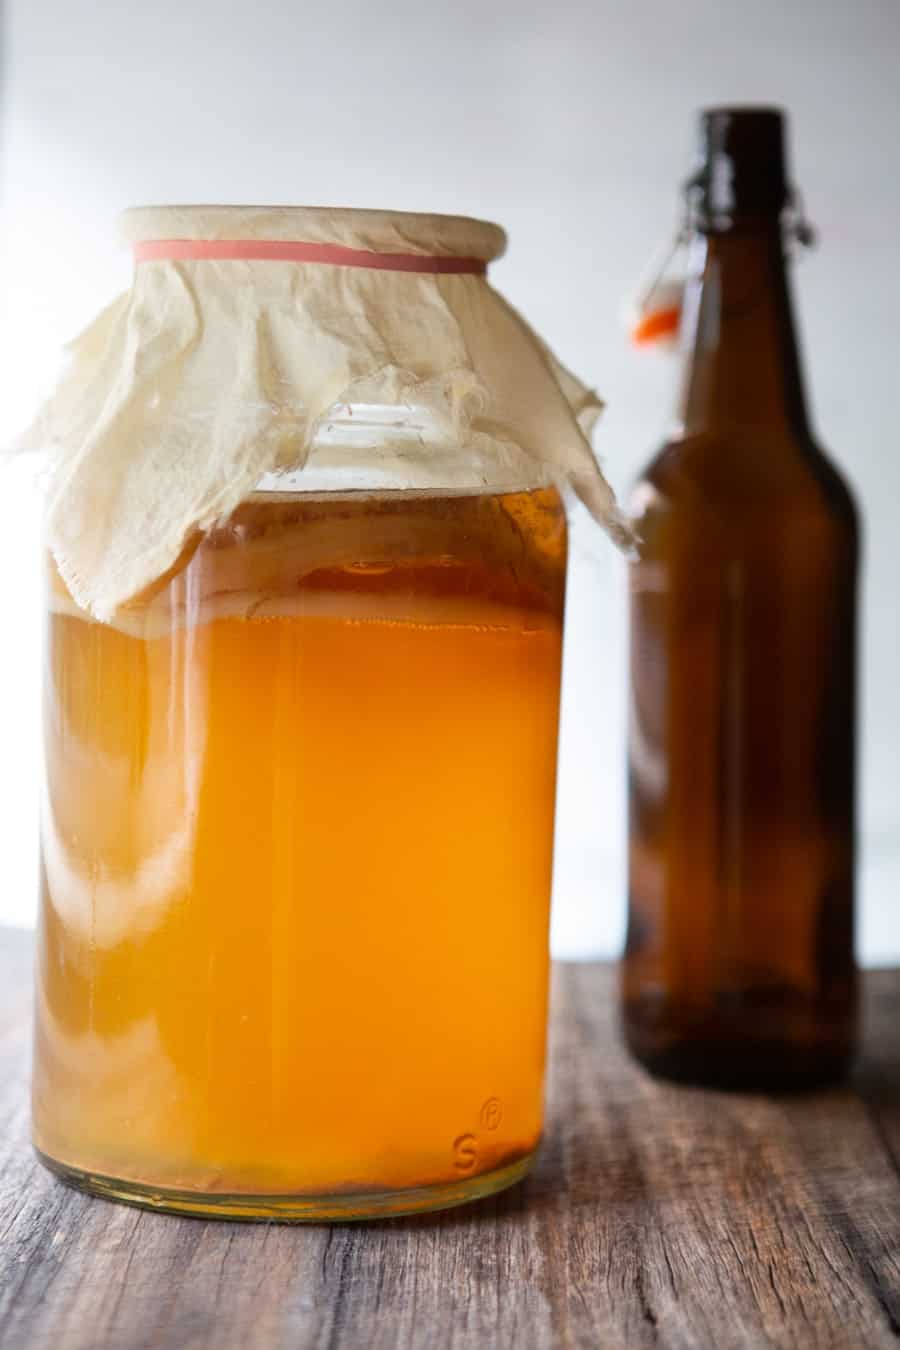
You can see in the image above that I use a large jar to brew my kombucha in. You can use something like this or I’ve seen others using a dispenser style glass jar so once the kombucha is finished, they can just use the tap to pour some out and refrigerate it.
The jar I use holds around three litres. If you have a big one like mine, just double the recipe ingredients below (you’ll only still need one SCOBY, just more of the starter liquid). You can see multiple SCOBY’s in that image; I tend to leave them in there as one new one is formed each ferment.
Just make sure that you remove the jar lid and put a piece of muslin cloth over the top and keep it down with a wide rubber band. A cheesecloth or a thin tea towel will also work. As long as there is enough space for air to circulate through the kombucha as it ferments. You want to put something on top to keep any bugs coming in.
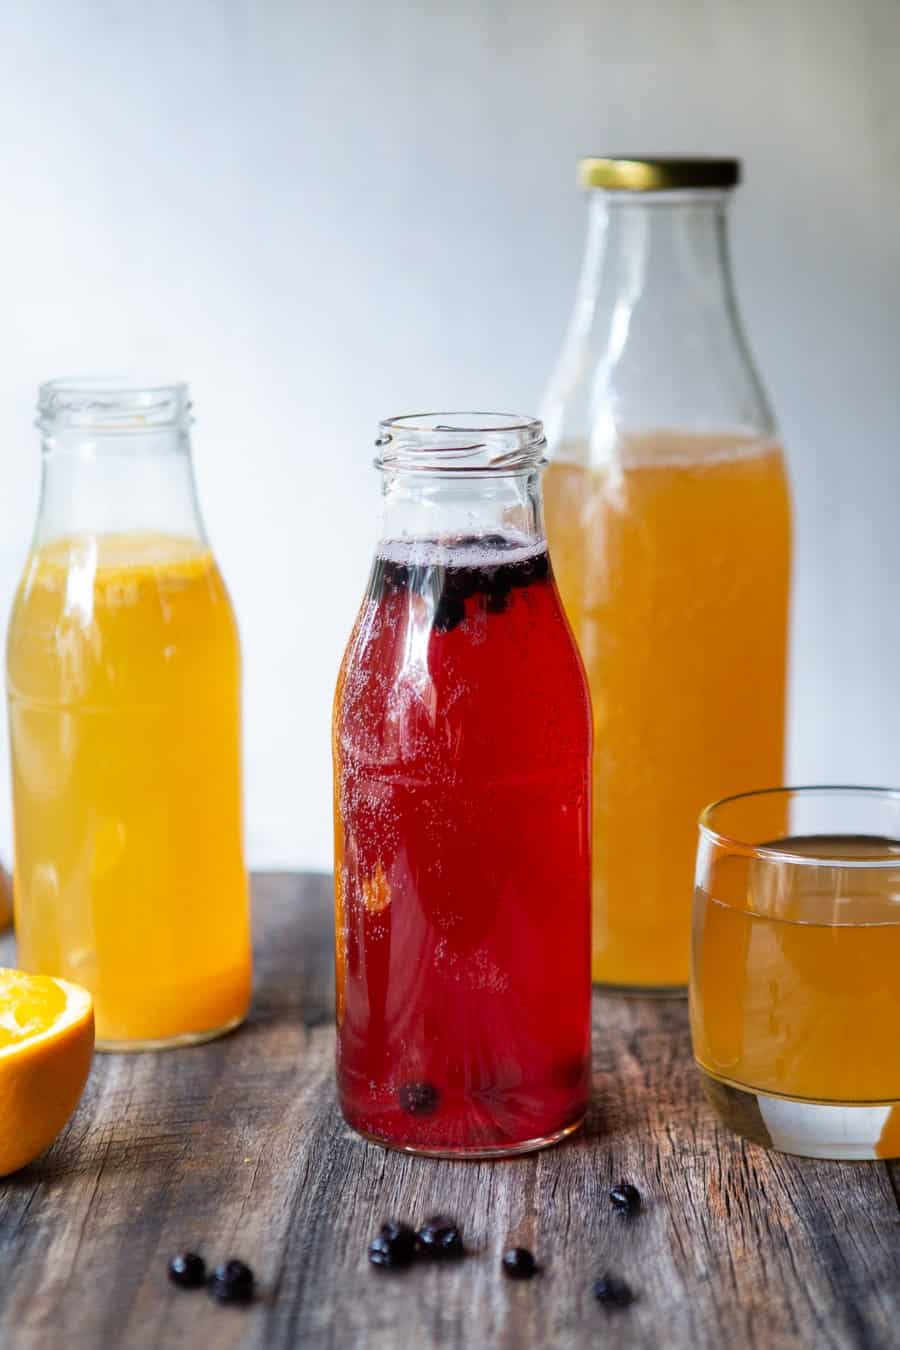
I’ve chosen to show you three different ways to finish off the kombucha with two different flavours and one being the plain original flavour—which is just the recipe without any additional flavour.
Orange and ginger flavour
For the 1.5 litres (recipe below) you will need:
- Juice of two oranges
- 3-4 cm knob of ginger, thinly sliced or for more intense flavour, you can juice the ginger and add the liquid
Leave it out on the bench in well-sealed bottles for 1-2 days and then place in the fridge until you’re ready to drink. Strain before drinking – unless you like the bits of ginger to chew on. I find that this flavour combination tastes like flowers for some reason!
Blueberry flavour
For the 1.5 litres (recipe below) you will need:
- 1/2 cup frozen blueberries (I use the small wild blueberries)
Leave it out on the bench in well-sealed bottles for 1-2 days and then place it in the fridge ready to drink. It will release a beautiful pink colour. Strain before drinking – unless you like the blueberries to chew on.
A few more tips for making homemade kombucha
Keep in mind that the sweeter the kombucha, the less fermented it is. If it’s too vinegary/acidic for you, ferment it for less time in the next batch. If it’s too sweet, leave it for an extra few days. The less sweet it is, the healthier it is, as the sugar has been eaten by the bacteria.
Try and test it before you flavour it to make sure you’re happy with the flavour balance. The way that I gauge how long to ferment it for is based on the season and the temperature in my kitchen. In summer, it takes around 7-10 days, and in winter it can take around 3-4 weeks. This batch took about three weeks as we’re in the middle of winter.
Try and avoid letting the SCOBY come in contact with metal; it will weaken it over time. So don’t ferment it in a metal jar/container.
Make sure that everything that you use in the production process is clean. You can easily contaminate it, which will lead to growing mould. Also, try and avoid using wood as it tends to absorb flavours and foods from what you’ve been cooking.
If you’re wondering where you can get your hands on a SCOBY and some starter, ask around in your circle of friends and family. Someone might have a spare. If not, they are easily accessible online like here and here as well as some health food stores. Please feel free to ask me any questions you might have about making your own kombucha at home as I probably missed some details in the post. Enjoy it 🙂
Other drink recipes you’ll love:
- Immune Boosting Herbal Tea
- Alkalising Green Juice with Mint and Lime
- Raspberry Rose Lemonade
- Cinnamon & Vanilla Chai Tea
- Our Breakfast Superfood Smoothie
- Ginger Grapefruit Spritzer
If you try this recipe, let me know! I would love for you to leave a comment and rating below. If you want to go that extra mile, tag us on Instagram or share your photo of the recipe on Pinterest.
Print
Homemade Kombucha Three Ways
- Yield: 1½ litres
Description
Nothing quite beats homemade kombucha brewed with love, care, and optimum health in mind. Learn how to make your own easy kombucha with different flavours.
Ingredients
- 1 tablespoon loose leaf black tea, or 4 teabags (I use English Breakfast)
- ½ cup / 100g raw sugar (use organic if in the US to make sure it’s vegan)
- 1 SCOBY
- 1 cup starter (the liquid that comes with the SCOBY)
Instructions
- First, boil 7 cups / 1.75 litres of water. In a large bowl or jug, put in the sugar and tea (I use a compostable coffee filter so that I can strain it easier). Pour in hot water and mix well making sure that all the sugar dissolves while the water is still hot.
- You can take the tea out after 10-15 minutes or leave it in there until it completely cools. I usually leave it in for a stronger flavour.
- Once completely cooled, pour the sweet tea, SCOBY, and starter into a large jug or jar that you can easily seal with a muslin cloth and an elastic band.
- Place in a preferably warm, but out of direct sunlight spot. You can risk the kombucha going mouldy if the room temperature is too low. I place it on the kitchen bench out of the way. Try and avoid moving it too much in the first couple of days as the SCOBY needs to start doing its magic with the starter.
- It’s typically best left for at least 7-10 days (Summer) and 14-21 days (Winter). The colder it is, the longer the fermentation process takes.
- You will notice that there will be a new SCOBY forming on the top of the liquid. You can either give it to someone else with a cup of starter to begin their own kombucha process, keep it aside by creating a SCOBY hotel or throw it in the compost.
- Once it’s finished fermenting (according to the number of days mentioned above), separate 1 cup of the mix (your starter) and a SCOBY into a jar and use the rest for drinking.
- Bottle and flavour it (if desired) and leave it out for 1-2 days so that it can fizz up some more (I am a little lazy and normally skip this step), making sure to ‘burp’ the jar to let out some of the gas build up.
- Pop in the fridge and serve when cold.
- It can stay in the fridge for months. It just never lasted in my household for more than one week!
- Keep in mind that as soon as you put it in the fridge, it slows down the fermentation process so you may notice a slight difference in taste over a long period, but short term, it will taste the same.
Notes
If you start to notice white, black or green patches/spots forming on the top, that means it’s mouldy. Do not try and revive it. The mould has spread through the whole mix. Discard it and start again. This is why it’s always a good idea to keep some starter and a spare SCOBY in a plastic container in the cupboard (in plastic so you don’t have to remember to ‘burp’ the bottle as it can explode from all the gas build up inside).
- Diet: Vegan
Great article. Never made it before. Will still read it several times. Thank you.
You’re welcome! Once you get the hang of it, it’s easy peasy 🙂 Happy brewing!
Question for flavoured kombucha. Were the ingredients for flavouring put in the begining of making kombucha? And put on a bench 1-2 days then put in fridge.
I my self make original black tea flavour kombucha, and takes minimun 12 days out side fridge to have perfect taste.
Looking forward for your answer. And thanks for sharing your recipes 😊
Hi Vera, I’m sorry if I didn’t make that clear. You flavour it in step 8 – which is after the first fermentation has finished (when you leave it out on the bench to fizz up).
I started my very first kombucha 2weeks ago. So excited!!! I’m so glad I read this because I forgot it takes longer in the winter to ferment. You also calmed me down.lol …… all the rules and I was complicating it. Phew glad I saw this.
I would send you a picture but lol I’m not sure how
Thanks again,
Penny Mefford
Happy brewing! Yes, it does take a few goes to ease your way in but it’s so simple to make at home that I’ve never bought another bottle now in years. Glad it came at just the right time 🙂
I’m new at making Kombucha. My plain ginger always has great carbonation. The fruit flavors have much less. Am I doing something wrong?
From my understanding, ginger just helps to make the kombucha fizzier! This is why it’s different 🙂
I have been making this recipe for about 12 months now, I haven’t flavoured any of my batches yet as I like it as it comes. I just love how simple it is to make, but most of all I love the health benefits it has had for me. Many thanks. ❤️
I recently started making kombucha and appreciate your post. When I started making it I had a scoby from a friend, but could not find plain kombucha to use as a starter. My husband commented “Kombucha has been around forever, trust me, they didn’t go to the store for plain kombucha, to use as a starter, 100’s of years ago.” I did some online sleuthing and determined that you can use a quarter cup of apple cider vinegar to a half gallon of tea. It turned out really well. I was kind of geeked by this and thought I would share.
Oh gosh! I’m so sorry Karen, I completely missed your comment! That’s really interesting and useful information 🙂 Thanks for sharing.